Lab 1.6 Connected to Internet with RouterBoard Mikrotik (Wireless)


Assalamualaikum Wr. Wb.

Hello everybody, now i will show you how to connect to internet with RouterBoard Mikrotik wireless

A. The purpose of this post is
  • How to setting the internet connection with wireless in Mikrotik RouterBoard
B. The materials or tools we need to do this is
  • RouterBoard
  • UTP Cable (Strike)
  • PC/Laptop


Before we start, connect the RB (RouterBoard) to Laptop/PC with UTP Cable in port 2

First, login with Mikrotik using MAC Address (


Click connect


Click on the Wireless and double click wlan1


 Click enable to active the wlan1 after that click apply and OK


Now, you will see the wlan1 is active


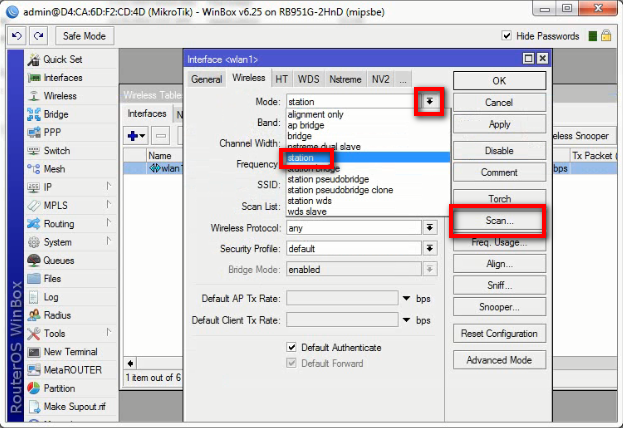
Double click the wlan1 again and go to wireless side,  choose the mode to station and click scan


Here, you will choose the network then click connect


Click Security Profiles


Click + symbol to add new security profiles


Fill the name with your own name, choose the mode in dynamic keys, after that check all selections and fill the password with password of your network. After all of that click apply and OK


 After setting the security profiles, we will go to the wlan1 again, in the wireless side choose the security profile with your own that already created then apply


Now if you see the sign R in the left of wlan1 is mean you already input the security profile to wlan1  and we will go to Registration


 In here, you will see one list is that mean you already active the security profile


Now we will go to get the ip address with DHCP Client, click IP and choose DHCP Client


Click symbol +, choose the wlan1 in interface column and choose apply


After that wit for a while and you get the first IP Address automatic (we need two IP address to connecct the internet


Enter the command like the picture below the this text (In address you can change it with your own but don't same it with the first IP Address and for gateway change it to your own gateway


 After that ping the gateway and google to test the connection


Now we will go to client. Here, you see that we not connected to network so we must setting the IP firstly


Fill the IP Address, Subnet mask, Default Gateway, and DNS (For Gateway and DNS you must fill it with your second IP Address and for Subnet you must fill it same with Mikrotik Example : /24=255.255.255.0  /29=255.255.255.248. And for IP Address you must fill same with the gateway but change the last value behind the point Example : if your gateway is 172.16.11.1, ou IP Address is 172.16.11.2-254.


After that you will see the connection has already connected


Open CMD and ping the gateway (Mikrotik) and google to test the connection


If you successful ping, you can check it like the picture


It's all for this post, if you have problem you can ask me anytime

And this is the video to help you if you have problem


Black Bullet


Osu, ane balik lagi nih. Kali ini ane akan share anime yang menurut ane cukup seru yaitu "Black Bullet"

Black Bullet adalah suatu anime dimana manusia dikalahkan oleh parasit viral bernama Gastrea. Manusia kemudian dikucilkan ke sebuah wilayah yang sempit, hidup dalam keputusasaan dan teror. Di dunia ini, terjebak ke dalam kegelapan |Rentaro|, seorang pemuda yang merupakan anggota sebuah organisasi bernama keamanan sipil, organisasi yang bertujuan untuk memberantas Gastrea harus berjuang untuk menyelesaikan tugas berbahaya.

Cukup segitu sinopsis nya

Langsung aja nih link download nya

Click Here

再びお会いしましょう (Futatabi o ai shimashou)

Lab 1.2 - Remote MIkrotik


Hey everyone, i am here. Now i will tell you how to remote Mikrotik.

Purpose of this post is :
  • To tell the students how to remote mikrotik
  •  
Materials :
  • Laptop or PC
  • VirtualBox
  • Putty
  • Winbox
  • HyperTerminal
  • Mikrotik

Steps :

1. Open Mikrotik in VirtualBox


2. Check the IP in Mikrotik


3. Also you must configure the IP in your PC


4. Test Computer IP in Mikrotik with command Ping


5. First, we will try with Winbox. Open Winbox and select sign ...


6. Choose IP Address


7. Click Connect


8. Close the RouterOS Welcome and Open New Terminal


9.  Ping IP of the Computer to get the result and check IP Address with command "ip address pr/ip address print)


10. We will try with Putty. Open Putty and fill the column with IP Mikrotik and Port Putty (Port Putty is 22 if you haven'tb changed it)


11. Select Yes


12. Login with your username (Here, i use the default username so i login with admin)


13. Ping IP of the Computer (again) to get the result and check IP Address with command "ip address pr/ip address print)


14. Now we will try with telnet. First we need to open CMD


15. Don't forgot to mark the telnet client in windows feature, if not you can't access the telnet via cmd


16. Enter the command "telnet ...(... = use your mikrotik ip address)


16. Fill the username and password


17. Test in client with the same command as before (see number 9 &13)


18. The last we will remote mikrotik with HyperTerminal. Open HyperTerminal, enter your username


19. Enter the IP Address and port HyperTerminal (port HyperTerminal is 23)


20. Login with your user and password


21. Test in HyperTerminal like before (I'm sorry if the picture is crash but i can't do anything about it. I already asked my friend about it and they have the same problem. I will try to fix soon)


Done. You can remote Mikrotik now. Hope it help you.
See you next post.